fbpx

Organizing Your Kitchen Will HelpYou BEE Ready for the Holidays

Organizing Your Kitchen Will HelpYou BEE Ready for the Holidays

Organized kitchen Pantry

The holiday season is getting closeā€”and with it will come the whirlwind of cooking, baking, cleaning, decorating, hosting, and more! For most of us, the kitchen is the center of our busy Hive, and itā€™s a place that takes on extra responsibility during the holiday season. As you count the days until your first holiday festivities, you can help your future self by purging, restocking, and organizing three prime areas of your kitchen.

Recipes and Cookbooks

If you are like us, you have recipes in every conceivable formā€”emails, bookmarks in browsers, handwritten recipe cards, print-outs of aspirational recipes, and cookbooks upon cookbooks. Before holiday cooking and baking begin in earnest, think about finally getting a handle on your recipe situation. As you tackle your recipe collection, the first place to start is by taking a hard look at your cookbooks. The most optimistic version of yourself might have bought most of your cookbooksā€”or perhaps youā€™ve received cookbooks over the years as gifts or family heirlooms.

The first step, as always, is to use our famous Power Purge to sort through the cookbooks and recipes that are just taking up space. Look through your cookbooks and take photos of any promising recipes before clearing the books out of your kitchen.

Consider moving to a completely digital recipe organization system. Some of us have had excellent luck using Google Drive to keep our recipes organizedā€”whether itā€™s a spreadsheet of links to recipes from all over the internet or a series of folders where you keep photos and PDFs of recipes sorted by category. We know of some folks who make it a policy to always email themselves recipes with very clear (and searchable!) subject lines.

If you have a variety of recipes on paper and donā€™t feel compelled to scan them into the digital world, think about using a binder to organize and preserve your recipes. You can use clear plastic sleeves with pockets to protect handwritten recipe cards from drips and splashes. Use a three-hole punch on your recipe printouts and a few tabs to divide your recipes into appetizers, desserts, holiday favorites, and more.

There is no one right way to organize your recipes, so feel empowered to adapt our strategies to fit your needs, usage patterns, and emotional connections.

Spices and Seasonings

When was the last time you spent some quality time tending to your spices? How many of them have long expired, never been used, or have lost their aroma? Before the holiday cooking begins, get your fragrant seasonings organized!

Before you start organizing anything, you need to discard those spices and seasonings that are too old to be useful. While most experts agree that itā€™s safe to use expired seasonings and spices, you should toss anything that is clumping or just smells off. Pinch a bit of the spice between your fingers and rub them togetherā€”if there is little or no fragrance, itā€™s probably time to replace that container.

Once you are down to those containers of spices and seasonings that are still in good shape, be honest with yourself about which ones you will foreseeably use in your cooking. If you are an adventurous chef who regularly experiments with new types of cuisine, your spices and seasoning needs will be much broader than someone who limits their cooking to tried and true recipes and styles.

Think about what organizational style will streamline your cooking. If you use a wide variety of spices, alphabetizing the containers could save you time searching when you are whipping up a new dish. Some folks have better luck with keeping their top 5 or 10 spices in easy reach, while they store the remainder in a container or cabinet. Spice racks, drawer inserts, or spinning trays can all help you make the most of your space. Whatever way you decide to organize your spices, make sure they are clearly labeled and in a cool, dark place when possible.

Finally, think about those recipes that you make during every holiday seasonā€”whether itā€™s cranberry sauce for Thanksgiving or black-eyed peas on New Yearā€™sā€”and make a list of herbs and spices to have on hand before the cooking commences!

Baking Ingredients and Tools

The final area to give yourself a holiday head start is with your baking ingredients and supplies. Essentially, you need to take inventory of the supplies you will need for your upcoming baking, whether you are making cornbread for Thanksgiving stuffing, pumpkin pies, or the whole range of Christmas cookies, candies, and other sweets. To begin, take EVERYTHING out of the baking section of your kitchen so that you can see what you have, what is expired, what tools need to be refreshed, and which ingredients need a re-stock. Check through our list to help prompt your memory about what you might need in the next few weeks of festivities:

  • Flour: All-purpose flour, cake flour, bread flour, gluten-free flour if needed
  • Sugars: Granulated sugar, powdered sugar, brown sugar (dark and light), other natural sweeteners like honey or maple syrup
  • Dairy: Butter, eggs, milk, buttermilk, heavy cream
  • Flavorings: Vanilla extract, almond extract, cocoa powder or chocolate chips, ginger, cloves, nutmeg, cinnamon
  • Other key ingredients: Shortening, vegetable oil, baking powder, baking soda, yeast, cornstarch
  • Supplies: Parchment paper, food coloring, sprinkles, cookie cutters, muffin/cupcake liners

Take a close look at your baking equipment too. If your favorite spatula has taken a beating or you notice your loaf pans are too scraped up to release properly, think about ditching and replacing them before you are up to your elbows in flour!

We hope getting your kitchen whipped into shape now will give you more time to do the things that bring you joy during the holidays! And if you get stuck somewhere in the process, you know you can always call in the Bees to get you back on track!

Simple Steps for a Clutter-Free Garage

Pictures of bicycles hanging in a garage

For some people, the garage is an afterthoughtā€”just a place to toss anything you donā€™t want in the house or to precariously stack every bike helmet and soccer cleat the kids have outgrown. But what if, instead, your garage worked for you? Giving some time and thought to what you store in your garageā€”and how and where itā€™s storedā€”can help make your home safer, more livable, and more functional!

Step One: The Power Purge

Did you know that 25% of homeowners have so much clutter that they canā€™t fit a car in their garage? Donā€™t waste your time organizing things that shouldnā€™t even be taking up space. Your first stepā€”and itā€™s a BIG oneā€”is to part with your excess items. We know this can feel overwhelming, which is why we have spelled out exactly how to tackle this project in our Power Purge blog post. Remove items from your garage that you no longer need, are broken, or are remnants of some forgotten project you donā€™t intend to come back to. Once youā€™ve cleared out the excess, you will have a much easier time organizing the rest.

Step Two: Sort into Zones

The most efficient way to organize your garage is to group similar items together into zones that make sense to you. Not only will this help you find items when you need them, but using zones can also help every household member know at least the general area of where to put things away. Youā€™ll need to tailor your zones based on your needs and climate, but here are a few common zones to get your wheels turning:

  • Sports equipment
  • Pool/Beach toys
  • Gardening supplies
  • Tools and hardware
  • Seasonal decorations
  • Auto maintenance
  • Camping gear
  • Cleaning supplies
  • Recycling and trash
  • Snow removal

Step Three: Go Vertical

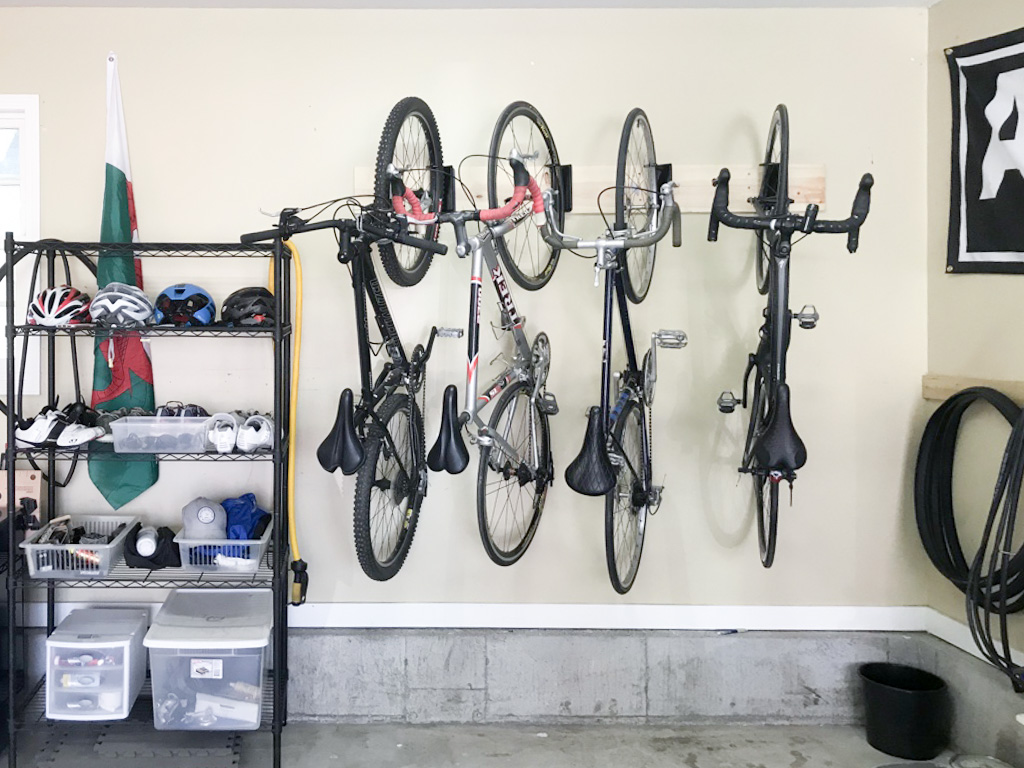
Once everything has been sorted into logical groups, you can figure out which storage areas in your garage make the most sense for each category of items. The one piece of advice we cannot say enough is to KEEP THE FLOOR CLEAR! Invest in shelving, hooks, wall-mounted baskets, and even overhead storage racks to maximize your vertical space. If you are like most homeowners, your garage troubles began with a ring of clutter stacked around each wall. Getting everything off the floor and onto walls and shelves will do more than anything else to make your garage more efficient.

Step Four: Safety Check

The garage is home to so many tools, liquids, and other substances that need to be stored safely. As you finalize your amazing work of organizing your garage, take a few minutes to double-check for potential hazards. Start with these main categories, but also keep an eye out for other hazards that are unique to your situation:

  • Bladesā€”Make sure anything with a blade (whether a large chop saw or a box cutter) is securely stored and out of reach of kids.
  • Liquidsā€”Lighter fluid, antifreeze, pesticides, paint thinner and other potentially hazardousā€”or just messy!ā€”liquids need special attention to make sure they arenā€™t at risk of being knocked over or grabbed by little hands.
  • Tippingā€”If you are lining your walls with shelves full of heavy things, ensure those shelves are firmly secured to the walls to prevent tipping. Triple-check the security of any heavy items stored or suspended above your head.
  • Trippingā€”Walk the perimeter of your garage and look for potential tripping hazards. Make sure all exits from the garage are accessible.
  • Fire extinguisherā€”Every garage needs a fire extinguisher. Make sure yours is current and easily accessibleā€”not on a high shelf behind a hundred other things!

Cleaning out and organizing your garage definitely isnā€™t easy, but itā€™s oh-so-worth-it in the end. And if you get stuck somewhere in the process, you know you can always call in the Bees to get you back on track!